Building a pickit2
In a previous article (see html), problems were met developing a toolchain for the PIC18F4550 in GNU/Linux.
Specifically, it was found that neither picp, picprog nor piklab-prog were able to program pic18 MCUs using the Picstart Plus programmer.
It became a choice of either being restricted to pic16 MCUs or using a different programmer.
The pickit2 has the best support under GNU/Linux and allows for both programming and debugging.
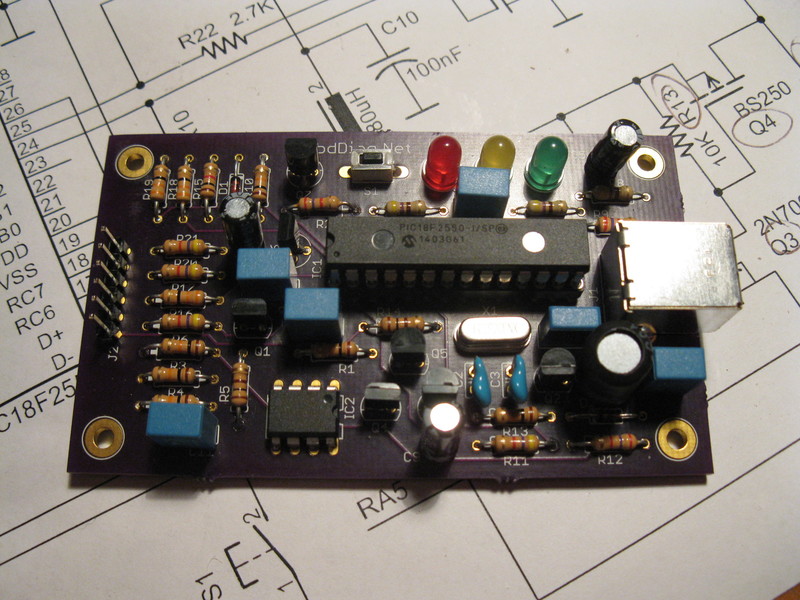
After a bit of reading I decided to build a clone, specifically the one from ObdDiag (html).
This project wasn't complicated, but a few things were accomplished:
- a PCB was commissioned from OSH Park board using the Eagle files from (html)
- the Picstart Plus and MPLAB-8 (in Windows) were used to bootstrap the pickit2 micro (itself a PIC18F2550)
- a blink program was uploaded using MPLAB-8 to test the pickit2 clone and verify the code
- the same blink program was then uploaded using
piklab-progpk2cmd
Building the board
The board was commissioned from OSH Park without any changes to minimize the number of potential problems. Note that the parts list (html) did not correspond to the schematic (pdf). In particular, a few additional resistors (three 470Ω and one 1kΩ) were needed. Apart from that, ordering the parts and building the board was a relatively straightforward process (see Figure 1).
Programming a PIC18F2550
As is often mentioned, there is a bootstrapping problem with programmers -- that is, you need one to make one. Fortunately, the Picstart Plus can flash pic18s with MPLAB-8 (html) just fine in Windows. So it was used to flash the pickit2 v2.32 firmware (hex) to the pic18f2550. To do this, enable the programmer, load the hex file with File->Import then flash with Programmer->Program. If the programmer isn't detected, check you have selected the correct COM port (check the Windows device manager). If the programmer is detected but the hex file doesn't upload, make sure you have selected pic18f2550 as the target chip.
Programming a PIC18F4550
After transplanting the pic18f2550 micro to the pickit2 board it was time to test. Windows detected the pickit2, but it should be noted that the programmer didn't show up as a COM port in the device manager. The blink program (html) was compiled with XC8 compilers and uploaded to the PIC18F4550 development board without any problems. Programming with a pickit2 was an order of magnitude faster than the Picstart Plus, which was nice.
Now that the pickit2 clone was known to work, it was time to test it in GNU/Linux.
After some initial confusion it was found that, unlike the Picstart Plus, this programmer is not a serial device.
Instead, you'll need to manually create a new rule to tell udev what to do with it.
$ udevadm monitor
then plug in the pickit2. This is the kernel device monitor which detects newly plugged devices. In particular, it shows the device path which can then be used to find its attributes:
$ udevadm info -a -p /devices/pci0000:00/0000:00:1a.0/usb1/1-1/1-1.2/1-1.2:1.0
From the output, the following attributes were found:
...
ATTRS{idVendor}=="04d8"
ATTRS{idProduct}=="0033"
...
These numbers are specific to the pickit2 and are used to identify it.
Create a new file /etc/udev/rules.d/50-usb.rules as root and enter the following.
SUBSYSTEM=="usb", ACTION=="add", ATTRS{idVendor}=="04d8", ATTRS{idProduct}=="0033", MODE="0660", GROUP="uucp", SYMLINK+="PK2"
Upon plugging in the device, a symlink called /dev/PK2 should be created.
Make sure to add yourself to the uucp group to be able to write to it.
# usermod -a -G uucp username
Now the actual programming, right? Nope. After a bit of reading, I found that piklab-prog is not compatible with the pickit v2.32 firmware on the pickit2. So the options were to either downgrade the firmware or scrap piklab-prog. After a bit more reading I decided to use the Microchip sanctioned software, pk2cmd, instead. This, fortunately, worked with the command:
$ pk2cmd -PPIC18F4550 -Fblink.hex -M
PICkit 2 Program Report
3-9-2014, 12:44:56
Device Type: PIC18F4550

Program Succeeded.

Operation Succeeded
Hooray! Time to update the makefile. I should note that, while the blink program worked, the time between blinks was much longer. This probably had something to do with the configuration bits and/or the clock speed.
Yet another programmer?
Now that the board is tested and known to work, it's possible to make small changes, if one were so inclined:
- Many of the components were rated at a very high voltage (e.g. 240V) and the cost could be reduced by buying, say 30V variants. I'm not sure why Alex chose to do this, maybe because the increase in cost is small relative to the pain of accidently shorting the circuit and having all the components blow up.
- Using a mini USB type B connector because they're smaller and more common
- Using the surface mount variant of the pic18f2550 and smaller components to reduce the size of the board
Conclusion
The next step of the toolchain is the compiler. The next article will focus on this, specifically the differences between the XC8, XC16 and SDCC compilers. The choice of compiler is significant since they compile slightly different variants of the C language. Once you have invested a lot of time with one, writing libraries and such, it will be difficult to switch.