Radio communication part 1
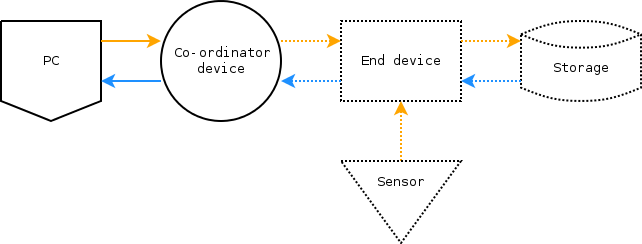
Radio should be used when transmitting data over long distances, or when cables are impractical or undesirable. This is the first in a series of articles that use XBee S2 radios to build a wireless sensor network. In this article, API packets will be sent and received between a PC and a co-ordinator device (see Figure 1).
Parts list
For this article there is only a short parts list:
Hardware
The first step was to test the hardware. To do this, the the legacy version of X-CTU was installed using Wine (see html) and COM ports were added by following Doug Brown's excellent article (see html).
The XBee adapter was built, XBee S2 installed and the device connected to the PC.
Using X-CTU, the XBee was first "Test/Queried" to ensure it was detected properly.
The firmware was read and found to be ZIGBEE ROUTER AT.
The functionality was then tested using some AT commands in the X-CTU terminal, such as querying the baud rate (ATBD).
Ultimately, data will be transferred using packets, so the next step was to flash the radio with ZIGBEE COORDINATOR API firmware v.218C, and begin writing the API packet library.
Software
An API packet library was required to enable all devices to handle packets. To prevent duplication of code, the same library should be able to be compiled for the PC and the peripheral devices. Such API packet libraries exist for Arduino (written in Processing, see html) and x86 architectures (written in C++, see html). However, what was required was a library that could be compiled for both for PCs and general AVR architectures.
So a new library was written for this purpose in C++.
Yet another API library
All XBee packets begin with the value '~' (or 0x7e in hex).
At the time this character is first received by any device, the incoming packet type is still unkown.
Thus the data are stored as the base class packet, XBeePacket.
Then, once the packet is complete and checked, it is "cast" as a special type of packet according to its type.
Special packet types are derived classes of XBeePacket.
The derived packet types implemented at the time of writing were:
- AT Command (
ATLocalTx) - AT Command Response (
ATLocalResponse)
For the PC, this library was compiled with g++ and wrapped with SWIG for use in a Python script.
For the AVR MCU, the same library can be compiled, along with a main routine, with avr-gcc into a hex file for uploading.
It took a bit thought to know where to draw the line between the C++ code and the SWIG extension code. Due to space constraints, the radio peripherals must include only the bare minimum of code. So things like manual construction of packets and pretty-printing of responses was relegated to SWIG and Python. Things like constructing a packet from a string of characters (such as would happen when receiving radio transmissions) was kept in C++.
Result
After a bit of work, the program successfully sent an AT command to co-ordinator device, and printed the response. The output is shown below:
# Settings:
#   port:     /dev/ttyUSB0
#   baud:     9600
#   parity:   N
#   stopbits: 1
#   bytesize: 8
# Connection open: True
# -------------------------------
Sending packet:
 Frame ID: 0x52, AT command: BD

Parsing response:
packet type 0x88 complete!
 Frame ID   = 0x52
 AT command = BD
 AT value   = 0x03
 AT status  = 0000

# Done.
In this example, the transmitted packet queried the baud rate of the connected radio, and the response packet indicated that it's value was 0x03 or 9600.
Conclusion
First step complete! Communication has successfully occurred between a PC and an XBee S2 radio over USB. The next step is to use the local radio to query the baud rate of a remote radio. Then the task of building peripheral devices that can record and transmit data can be started.